|
|
Post by Lee on Mar 12, 2009 22:23:43 GMT
being a good biker.. I believe in maintaining my machine.
Prevention being better than cure, especially with plenty of trips abroad penciled in for the not too distant future.
The blade arrived end of last summer in a bit of a ratty condition, the chain condition said it all really.
Removal of the rear wheel should typically take around five minutes; but overtighening, rust, rounded nuts and general neglect meant this simple task would take me almost 3 hours :shock:
in all I spent 2 full days cleaning up the rear swinging arm alone... the bearings too must need doing I thought... theres a job for the winter!
Tonight I have removed both wheels and knocked out all the bearings. The sprocket carrier bearing was buggered and so was another of the rear bearings. The remainder were ok and could be re-used. Fortunately the tax man refunded my winter months road tax when I sorned the bike...he can treat me to a complete new set!
Jacob my son took photos which I will upload later
Tomorrow I will aquire the new bearings ready for saturday mornings fun.
|
|
|
|
Post by Lee on Mar 12, 2009 22:27:16 GMT
First things first, get the bike off the floor by lifting both ends with paddock stands, If you have a centre stand you will probably need chocks of wood under it to give you sufficient clearance to remove the front wheel  Next slacken the brake caliper bolts and remover the calipers  |
|
|
|
Post by Lee on Mar 12, 2009 22:30:40 GMT
Slacken the pinch bolts at the bottom of both forks  next slacken the main spindle bolt (if its very tight, bring the bike down from the front paddock stand so that you can safely put leverage on without tipping your bike over ;-)  |
|
|
|
Post by Lee on Mar 12, 2009 22:35:04 GMT
now give the spindle a tug from the other side until it is removed supporting the weight of the front wheel as you allow it to rest on the ground  Now you can move away from the bike with the front wheel, whilst working on the wheel its a good idea to support the wheel with wooden chock in order to avoid putting weight onto the wheel and subsequently onto your discs (and then warping them) ;-) Once out, gently prize out the grease seals with a large flat screwdriver  |
|
|
|
Post by Lee on Mar 12, 2009 22:38:40 GMT
Next, using a suitable drift (i use two socket extension bars) knock the bearings out from the inside> out  there...easy!  |
|
|
|
Post by Lee on Mar 12, 2009 22:45:26 GMT
once the bearings are out, providing you were gentle whilst removing the grease seals and didnt damage them you should place them and the centre spacer in a bowl of clean petrol and clean them up. The books tell you to use new grease seals.. but you know.. credit crunch and all that. if they are a little bit wonkey they can be put on a flat surface and tapped back into shape with a small toffee hammer  once everything has been cleaned up its time to fit the new bearings. Its easy to damage new bearings whilst fitting them by hitting them in the wrong place. To avoid this place the new bearing into the hub and then place the old bearing on top of it. Its now safe to give the old bearing a persuasive tap with a hammer knowing that pressure will only be put upon the outer races of the new bearing. (thats the shiny bits if this is your first time) It makes sense to clean all the hub out before fitting the new bearing, I like to smear plenty of fresh grease in there too. If the old bearing is full of rust, place a cloth between it and the new bearing to avoid transferring rust between old and new bearings ;-)  |
|
|
|
Post by Lee on Mar 12, 2009 22:49:43 GMT
once the new bearing has been driven all the way home, give it a wipe, apply a smear of clean grease, then retrieve your cleaned up grease seal, push some fresh grease into the back of this and tap it back over the bearing with a small hammer. Flip the wheel over, REFIT THE CENTRE SPACER (the pipe in between the two bearings) and then do the same on the other side...clean, grease, new bearing in, grease, seal etc. thats the front wheel done... Re-fit it remembering to re-fit any spacers  Now its time to remove the back wheel Slacken the main axle bolt  then slacken your chain adjusters so that the wheel goes as far forward as possible making the chain as slack as a whoores drawers  |
|
|
|
Post by Lee on Mar 12, 2009 22:56:34 GMT
remove the chain from the rear sprocket  give the spindle bolt a tap and tug it out of the other side, nice and easy supporting the rear wheel with your free hand as it comes away. Take note of any spacers and their positioning at the side of the hub as the wheel is removed (sorry about the quality of this photo)  |
|
|
|
Post by Lee on Mar 12, 2009 23:01:24 GMT
same drills with the back wheel, move it away from the bike and gently remove the grease seal from the sprocket carrier, then put the seal in your petrol bowl for cleaning the rear wheel has three bearings, One large one in the sprocket carrier and two regular ones the same as the front wheel  now, using your hands and some rags, grab the rear sprocket by its teeth and lever the sprocket from each side jiggling it until it lifts up away from the wheel (this can be a bit of a battle) This will reveal the inner drive fins and cush(ion) rubbers (The wheel bearing has been driven out on this photo in the same manner as the front wheel was done.) 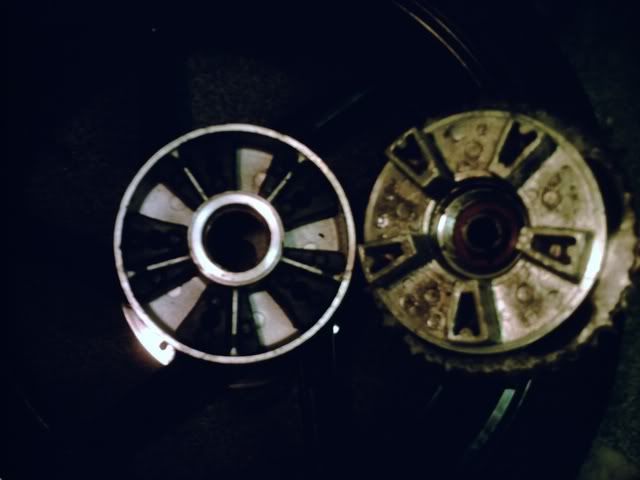 Clean all this area up and remove any crap/rust/salt deposits Replace the wheel bearings in the same manner as the front wheel (REMEMBER THAT TUBING SPACER THAT RUNS THROUGH THE CENTRE) On the FireBlade there are only grease seals on the sprocket carrier bearing and the outer wheel bearing, the middle bearing buts up smartly to the sprocket carrier on re-assembly(a bit of grease wont go amiss though) Next its time to drive the larger bearing out of the sprocket carrier. The FireBlade has a spacer that supposedly just "lifts out" yeah righto.. it was siezed solid. The sprocket was placed upon a vice and with the aid of a large socket, an extension and a big hammer, the bearing was driven from the inside>out without damaging the spacer  |
|
|
|
Post by Lee on Mar 12, 2009 23:08:21 GMT
here is the removed sprocket carrier bearing and the spacer that alegedly "just sits in it" Having a vice in the garage made a fiddly job pretty easy. The previous owner obviously thought that maintenance was a place in china and tightened the back wheel up like the keel plate of the QE2 :roll: Again lots of cleaning/wire wool, oil and lashings of clean grease  the sprocket carrier is cleaned up, given a smear of grease and the new bearing is put in place and assisted into position using the old bearing as a striker (same as the front wheel)  it only goes in so far, once its in, smear some grease on and re-fit the cleaned and greased seal 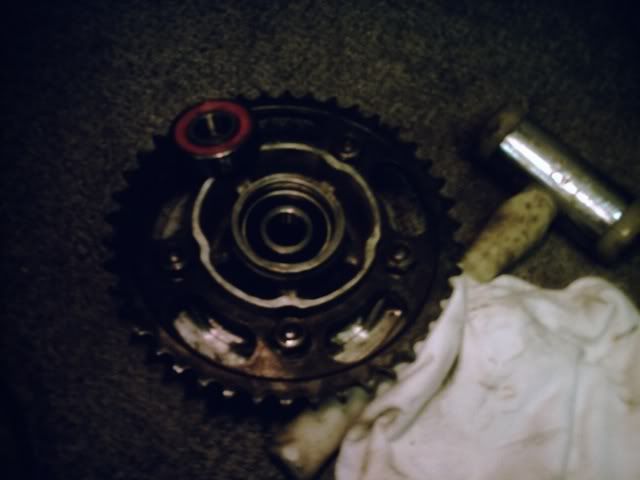 this photo shows cleaned up cush drive rubbers and drive fins, check the condition of the O ring seal around the center of the hub. A nice smear of grease on the unsealed bearing face before re-fitting the sprocket carrier (centre bearing has not been fitted yet on this photo) Dipping the cush rubbers in soapy water just before the reassembly helps the sproket carrier to slide back into place ;-) Remember to re-fit the spacer that "just lifs out" behind the sprocket carrier bearing before re-assembly ;-)  |
|
|
|
Post by Lee on Mar 12, 2009 23:14:10 GMT
here we go, new bearings are in and greased (so is the centre pipe spacer) sprocket carrier bearing is in along with the spacer that "just lifts out" allegedly.... all the bits and pieces are clean and its ready to go back together  the wheel is re-fitted as it was removed(including any spacers) The chain is tensioned as per THESE INSTRUCTIONSand the axle nuts, fork pinch bolts and caliper bolts are all torqued up to the manufacturers spec...or thereabouts :lol: there you go, about two hours of buggering about and £30, plus the satisfacion of knowing its been done right ;-) |
|
titus
Superbike Rider
 Fire up the Quattro !
Posts: 2,076
|
Post by titus on Mar 16, 2009 9:01:07 GMT
Good post Lee, did you actually replace both bearings !!! and the only thing missing is the picture at the end with your mug drinikng a well earned brew.
|
|
|
|
Post by Lee on Mar 16, 2009 21:00:54 GMT
Good post Lee, did you actually replace both bearings !!! and the only thing missing is the picture at the end with your mug drinikng a well earned brew. yep replaced all five of them! Stockton bearings!  |
|
|
|
Post by Lee on Oct 24, 2013 10:55:04 GMT
Bumped for Betty
|
|
|
|
Post by Betty Swallox on Oct 24, 2013 11:12:45 GMT
Thanks Lee. Wish I'd have known about the using the old bearings as a cushion for the new ones, oh well you live and learn  |
|
Deleted
Deleted Member
Posts: 0
|
Post by Deleted on Oct 24, 2013 15:22:10 GMT
If prevention was better than cure, you'd have overhauled that MV rear hub by now, just hope you don't find out after they've collapsed.....ouch! a well known MV weakness which shouldn't be ignored especially after I've offered to replace them several times for you |
|
Deleted
Deleted Member
Posts: 0
|
Post by Deleted on Oct 24, 2013 16:08:18 GMT
If prevention was better than cure, you'd have overhauled that MV rear hub by now, just hope you don't find out after they've collapsed.....ouch! a well known MV weakness which shouldn't be ignored especially after I've offered to replace them several times for you My thoughts exactly |
|
Deleted
Deleted Member
Posts: 0
|
Post by Deleted on Oct 24, 2013 16:08:53 GMT
Remember? What can happen, what did happen! |
|
nickw
Superbike Rider
Posts: 3,404
|
Post by nickw on Oct 24, 2013 18:04:52 GMT
PMSL, Gordon, you beat me to it..... It's stealing other peoples Blackwells Steak and kidney pies that does it... I've got a good memory!
|
|
|
|
Post by Lee on Oct 24, 2013 18:26:44 GMT
If prevention was better than cure, you'd have overhauled that MV rear hub by now, just hope you don't find out after they've collapsed.....ouch! a well known MV weakness which shouldn't be ignored especially after I've offered to replace them several times for you My thoughts exactly You can pop round with that new hub on your next rotation then Mclintock! |
|